How to Make Balloon Garland - Step-by-Step Instructions
You don’t need to be a DIY expert to set up our Balloon Garland. Just follow these instruction and you be surprised how easy is to create spectacular masterpiece that will add a magical, chic and modern touch to the look of any celebration.
Ideally, you will want to make a balloon garland the day your event and certainly no more than 24 hours prior to the time of the event. Changing atmosphere and temperature will impact the lifespan of your balloons.
Helium is not required to make a beautiful look. In case you are planning to use helium to inflate balloons make sure to know that balloons filled with helium last up to 3 hours.
First, gather all of your materials and clear some space, you will need an area that is free and clear of all clutter so that you can stay organized.
Unless you have a team of designated balloon inflators, I would highly suggest getting an electric pump. Inflating balloons with an electric pump is easier and will cut preparation time in half. When I say this will be a lifesaver, just know this will help you to complete the job in a fraction of the time.
Another timesaver is our balloon tying tool. it’s so much easier to tie balloons. This tool prevents soreness in your fingers and will help you save time.

Medium size balloons. These balloons can be inflated to different sizes from 8″ up to 12″. Make sure that the balloons are round by ensuring not to over inflate. Don’t blow balloons to full capacity. This will avoid that unsightly pear shape.
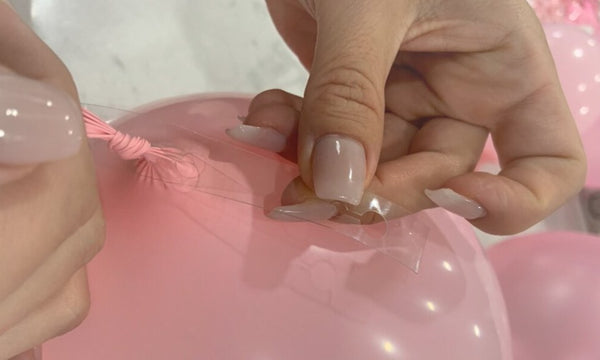
On the balloon decorating strip, each segment has two holes. Slide the knot that you tie with the balloon through the big hole, and then take that knot through the smaller hole. This will lock the balloon in place.
Once all of the large balloons have been put in place on the garland, begin to add medium size balloons. Make sure that you save small size balloons for the end to fill garland and give it a fuller look.
Don’t forget to skip the first few holes on the strip in order to hang your garland. Add balloons one by one, ensuring that your garland has a great overall shape. I prefer to go from one side to the next on opposite sides of the decorating strip.
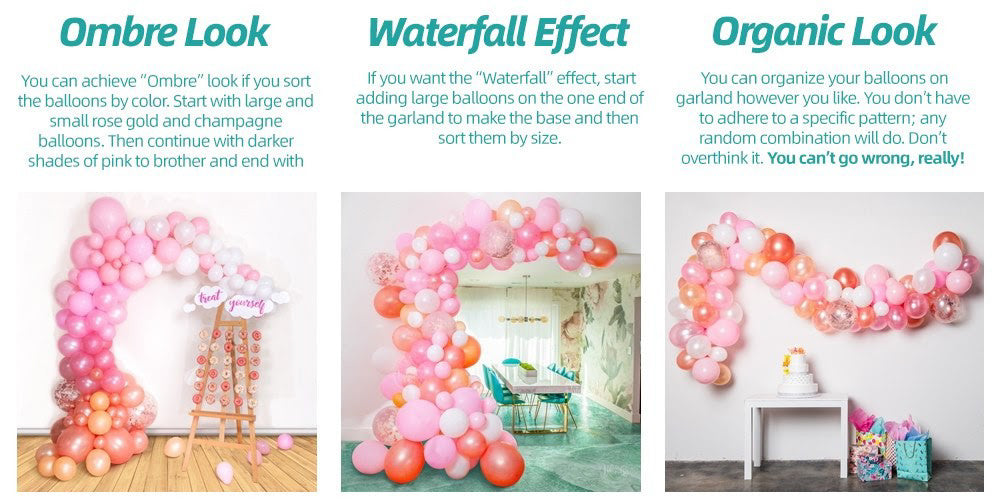
You can organize your balloons on garland however you like. You don’t have to adhere to a specific pattern; any random combination will do. Don’t overthink it. You can’t go wrong, really!
TIP: After inflating Confetti balloons, use a cloth to rub balloons. This will generate friction and Confetti will stick to the side. Repeat the step few times, so more Confetti will stick to the balloon and will make the balloon look more beautiful.
Place your garland wherever you please, make sure that the area is picturesque and in an area where it flows with your environment.
For an added touch, you may want to hang your garland on a wall. When hanging the garland on a wall, you can use hooks. Use a brand of hooks that will not ruin your wall. If you are not concerned with wall damage, then go ahead and use some nails.
Mix in several smaller balloons by securing them with glue dots to bigger ones. This will give your balloon arch a fuller look.
Finally, step in front of your garland and take 15 million pictures. Share them because you’re so thrilled with how easy it was! This will be the focal part of your entire night. This garland is a surefire conversation piece.